> ## Documentation Index
> Fetch the complete documentation index at: https://rive-debug-panel.mintlify.site/llms.txt
> Use this file to discover all available pages before exploring further.
# Fundamentals
## Adding Rive Assets
To add a `.riv` file to a Unity project, simply drag it into the Project Window. Once dropped, a **Rive Asset** will be automatically created.
Now you can display the Rive Asset within a **Rive Panel** and **Rive Widget**.
## File
A `Rive.File` contains Artboards, StateMachines, and Animations.
If you're working with the Rive Panel and Rive Widgets components, the Rive Widget will automatically handle loading the underlying Rive File from the assigned Asset.\
You only need to use this class directly if you want control of the lifecycle of the Rive File, or if you need to load the file from an external source like a CDN.
The `Rive.File` class also provides several methods to load Rive content into Unity:
If the file is already in memory, a cached version will be returned to improve performance and avoid redundant loading.
#### 1. From a Rive Asset (.riv file)
You can load a `Rive.File` from an imported `.riv` asset in the inspector:
```csharp theme={null}
public Rive.Asset asset; // pass in .riv asset in the inspector
private Rive.File m_file;
...
private void Start()
{
if (asset != null)
{
m_file = Rive.File.Load(asset);
}
}
```
#### 2. From a Unity TextAsset
You can load a `Rive.File` from a Unity `TextAsset`. This is useful if you have the bytes bundled as a `TextAsset` in the Unity project.
```csharp theme={null}
public TextAsset riveTextAsset; // assign in the inspector
private Rive.File m_file;
...
private void Start()
{
if (riveTextAsset != null)
{
m_file = Rive.File.Load(riveTextAsset);
}
}
```
#### 3. From a Byte Array
If you have the raw bytes of a `.riv` file, you can load it directly from a byte array. This method provides flexibility if you're loading the file data from a custom source or dynamically (e.g. from a CDN-stored file):
```csharp theme={null}
private byte[] riveFileBytes; // Your byte array, loaded from remote storage, for example.
private Rive.File m_file;
...
private void Start()
{
if (riveFileBytes != null)
{
m_file = Rive.File.Load(riveFileBytes, "myRiveFileName");
}
}
```
## Artboards
[Artboards](/editor/fundamentals/artboards) contain [State Machines](/editor/state-machine/state-machine) and Animations.
Using a **Rive Widget** component, you can select from a list of available artboards within a given **Rive File**.
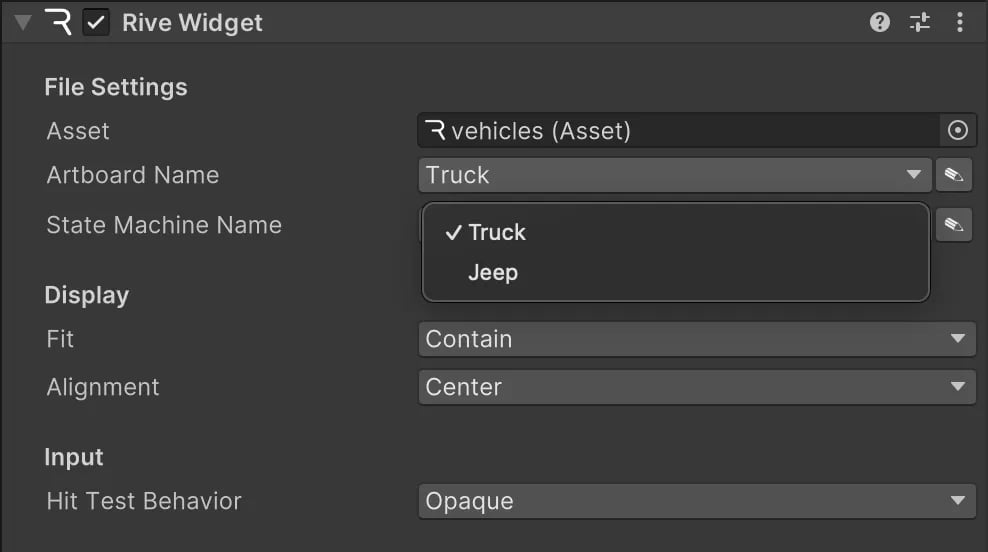 Using the low-level API is no longer recommended. Please use the [Component API](/game-runtimes/unity/components) instead for ease of use and maintainability. This content is provided for legacy support only.
Artboards are instantiated from a `Rive.File` instance:
```java theme={null}
private Artboard m_artboard;
...
m_artboard = m_file.Artboard(0); // by index
m_artboard = m_file.Artboard("Arboard 1"); // by name
```
## State Machines
For more information, see [State Machines](/game-runtimes/unity/state-machines).
Using a **Rive Widget** component, you can select from a list of available state machines within a given Artboard.
Using the low-level API is no longer recommended. Please use the [Component API](/game-runtimes/unity/components) instead for ease of use and maintainability. This content is provided for legacy support only.
Artboards are instantiated from a `Rive.File` instance:
```java theme={null}
private Artboard m_artboard;
...
m_artboard = m_file.Artboard(0); // by index
m_artboard = m_file.Artboard("Arboard 1"); // by name
```
## State Machines
For more information, see [State Machines](/game-runtimes/unity/state-machines).
Using a **Rive Widget** component, you can select from a list of available state machines within a given Artboard.
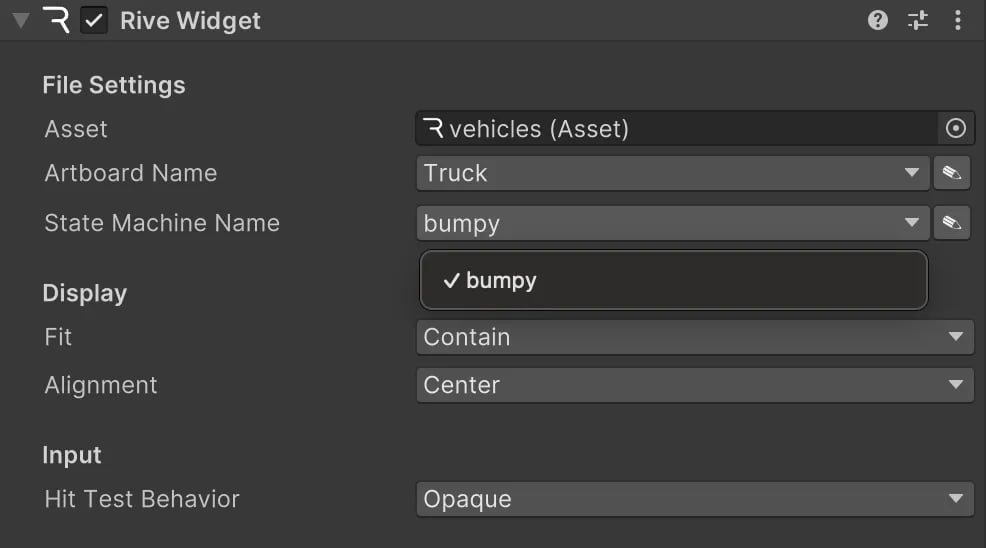 Using the low-level API is no longer recommended. Please use the [Component API](/game-runtimes/unity/components) instead for ease of use and maintainability. This content is provided for legacy support only.
State Machines are instantiated from an Artboard instance:
```csharp theme={null}
private StateMachine m_stateMachine;
...
m_stateMachine = m_artboard?.StateMachine(); // default state machine
m_stateMachine = m_artboard?.StateMachine(0); // state machine at index
m_stateMachine = m_artboard?.StateMachine("Name"); // state machine with name
```
They also control advancing (playing) an animation:
```csharp theme={null}
private void Update()
{
m_stateMachine?.Advance(Time.deltaTime);
}
```
## Rendering
In Unity, Rive renders to a [RenderTexture](https://docs.unity3d.com/ScriptReference/RenderTexture.html) that you can display in your Scene by attaching to a [Material](https://docs.unity3d.com/ScriptReference/Material.html) or anywhere else you would use a Render Texture within your project.
The **Rive Panel** automatically renders its **Rive Widgets** to a Render Texture.
Using the **Rive Canvas Renderer**, you can display a **Rive Panel** within a uGUI Canvas.
To display a **Rive Panel** on a GameObject's mesh, use the **Rive Texture Renderer.**
Using the low-level API is no longer recommended. Please use the [Component API](/game-runtimes/unity/components) instead for ease of use and maintainability. This content is provided for legacy support only.
Layout and draw commands are managed through the `Rive.Renderer`.
For a more complex example drawing a texture directly to a camera, see the **getting-started** project in the [examples repository](https://github.com/rive-app/rive-unity-examples).
The following is a basic example script behaviour to render a given Rive asset to the provided `renderTexture`. The animation is played by calling `.Advance()` on the State Machine.
See [State Machines](/game-runtimes/unity/state-machines) for more general information on playing state machines at runtime.
```csharp theme={null}
using System.Collections;
using UnityEngine;
using UnityEngine.Rendering;
using UnityEditor;
using Rive;
using LoadAction = UnityEngine.Rendering.RenderBufferLoadAction;
using StoreAction = UnityEngine.Rendering.RenderBufferStoreAction;
public class RiveTexture : MonoBehaviour
{
public Rive.Asset asset;
public RenderTexture renderTexture;
public Fit fit = Fit.contain;
public Alignment alignment = Alignment.Center;
private Rive.RenderQueue m_renderQueue;
private Rive.Renderer m_riveRenderer;
private CommandBuffer m_commandBuffer;
private Rive.File m_file;
private Artboard m_artboard;
private StateMachine m_stateMachine;
private Camera m_camera;
private void Start()
{
// If on D3d11, this is required
renderTexture.enableRandomWrite = true;
m_renderQueue = new Rive.RenderQueue(renderTexture);
m_riveRenderer = m_renderQueue.Renderer();
if (asset != null)
{
m_file = Rive.File.Load(asset);
m_artboard = m_file.Artboard(0);
m_stateMachine = m_artboard?.StateMachine();
}
if (m_artboard != null && renderTexture != null)
{
m_riveRenderer.Align(fit, alignment, m_artboard);
m_riveRenderer.Draw(m_artboard);
m_commandBuffer = m_riveRenderer.ToCommandBuffer();
m_commandBuffer.SetRenderTarget(renderTexture);
m_commandBuffer.ClearRenderTarget(true, true, UnityEngine.Color.clear, 0.0f);
m_riveRenderer.AddToCommandBuffer(m_commandBuffer);
m_camera = Camera.main;
if (m_camera != null)
{
Camera.main.AddCommandBuffer(CameraEvent.AfterEverything, m_commandBuffer);
}
}
}
private void Update()
{
if (m_stateMachine != null)
{
m_stateMachine.Advance(Time.deltaTime);
}
}
private void OnDisable()
{
if (m_camera != null && m_commandBuffer != null)
{
m_camera.RemoveCommandBuffer(CameraEvent.AfterEverything, m_commandBuffer);
}
}
}
```
1. Create a Unity [RenderTexture](https://docs.unity.cn/ru/2020.1/Manual/class-RenderTexture.html) and [Material](https://docs.unity3d.com/2019.3/Documentation/Manual/Materials.html) in Assets
2. Assign the **RenderTexture** to the **Material**
3. Drag this behaviour to a **GameObject** and attach the material
4. Link the .riv asset and **RenderTexture** on the **RiveTexture** (custom script) behaviour
Using the low-level API is no longer recommended. Please use the [Component API](/game-runtimes/unity/components) instead for ease of use and maintainability. This content is provided for legacy support only.
State Machines are instantiated from an Artboard instance:
```csharp theme={null}
private StateMachine m_stateMachine;
...
m_stateMachine = m_artboard?.StateMachine(); // default state machine
m_stateMachine = m_artboard?.StateMachine(0); // state machine at index
m_stateMachine = m_artboard?.StateMachine("Name"); // state machine with name
```
They also control advancing (playing) an animation:
```csharp theme={null}
private void Update()
{
m_stateMachine?.Advance(Time.deltaTime);
}
```
## Rendering
In Unity, Rive renders to a [RenderTexture](https://docs.unity3d.com/ScriptReference/RenderTexture.html) that you can display in your Scene by attaching to a [Material](https://docs.unity3d.com/ScriptReference/Material.html) or anywhere else you would use a Render Texture within your project.
The **Rive Panel** automatically renders its **Rive Widgets** to a Render Texture.
Using the **Rive Canvas Renderer**, you can display a **Rive Panel** within a uGUI Canvas.
To display a **Rive Panel** on a GameObject's mesh, use the **Rive Texture Renderer.**
Using the low-level API is no longer recommended. Please use the [Component API](/game-runtimes/unity/components) instead for ease of use and maintainability. This content is provided for legacy support only.
Layout and draw commands are managed through the `Rive.Renderer`.
For a more complex example drawing a texture directly to a camera, see the **getting-started** project in the [examples repository](https://github.com/rive-app/rive-unity-examples).
The following is a basic example script behaviour to render a given Rive asset to the provided `renderTexture`. The animation is played by calling `.Advance()` on the State Machine.
See [State Machines](/game-runtimes/unity/state-machines) for more general information on playing state machines at runtime.
```csharp theme={null}
using System.Collections;
using UnityEngine;
using UnityEngine.Rendering;
using UnityEditor;
using Rive;
using LoadAction = UnityEngine.Rendering.RenderBufferLoadAction;
using StoreAction = UnityEngine.Rendering.RenderBufferStoreAction;
public class RiveTexture : MonoBehaviour
{
public Rive.Asset asset;
public RenderTexture renderTexture;
public Fit fit = Fit.contain;
public Alignment alignment = Alignment.Center;
private Rive.RenderQueue m_renderQueue;
private Rive.Renderer m_riveRenderer;
private CommandBuffer m_commandBuffer;
private Rive.File m_file;
private Artboard m_artboard;
private StateMachine m_stateMachine;
private Camera m_camera;
private void Start()
{
// If on D3d11, this is required
renderTexture.enableRandomWrite = true;
m_renderQueue = new Rive.RenderQueue(renderTexture);
m_riveRenderer = m_renderQueue.Renderer();
if (asset != null)
{
m_file = Rive.File.Load(asset);
m_artboard = m_file.Artboard(0);
m_stateMachine = m_artboard?.StateMachine();
}
if (m_artboard != null && renderTexture != null)
{
m_riveRenderer.Align(fit, alignment, m_artboard);
m_riveRenderer.Draw(m_artboard);
m_commandBuffer = m_riveRenderer.ToCommandBuffer();
m_commandBuffer.SetRenderTarget(renderTexture);
m_commandBuffer.ClearRenderTarget(true, true, UnityEngine.Color.clear, 0.0f);
m_riveRenderer.AddToCommandBuffer(m_commandBuffer);
m_camera = Camera.main;
if (m_camera != null)
{
Camera.main.AddCommandBuffer(CameraEvent.AfterEverything, m_commandBuffer);
}
}
}
private void Update()
{
if (m_stateMachine != null)
{
m_stateMachine.Advance(Time.deltaTime);
}
}
private void OnDisable()
{
if (m_camera != null && m_commandBuffer != null)
{
m_camera.RemoveCommandBuffer(CameraEvent.AfterEverything, m_commandBuffer);
}
}
}
```
1. Create a Unity [RenderTexture](https://docs.unity.cn/ru/2020.1/Manual/class-RenderTexture.html) and [Material](https://docs.unity3d.com/2019.3/Documentation/Manual/Materials.html) in Assets
2. Assign the **RenderTexture** to the **Material**
3. Drag this behaviour to a **GameObject** and attach the material
4. Link the .riv asset and **RenderTexture** on the **RiveTexture** (custom script) behaviour
